
How Long Does Microblading Last? & How to Get Lasting Results!
There’s no question that microblading can add a vibrant change to your brows.
But the question is:
How long will it last? and is it worth your time?
The results last anywhere from 9 to 15 months depending on several factors which makes the 3-4 hours it takes to place the brows worth it for sure.
As someone who does microblading I have to answer with the obvious YES it’s so worth it! But allow me to explain why:
More…
How to make sure you get lasting results
One of the biggest advantages to doing microblading is that you get all of the advantages of a tattoo without the permanent aspect.
That’s why microblading is considered to be semi-permanent.
And by semi-permanent I mean it lasts about 9 to 15 months.
The microblading procedure involves placing pigment in the dermal/epidermal junction which makes the pigment stay there, but not forever.
One of the benefits of not going as deep as a tattoo is the fact that it WILL eventually fade over time. Which can be helpful if you decide you don’t want to continue with the brows after 1-2 years or decide you want to change colors.
Another reason it’s beneficial for your brows to fade is as we age gravity plays a roll in our skin, so we don’t want brows on our face that fit us in our 20’s but in our 60’s is too low. We can keep changing the shape as your face and style changes.
You can see a perfect example below:
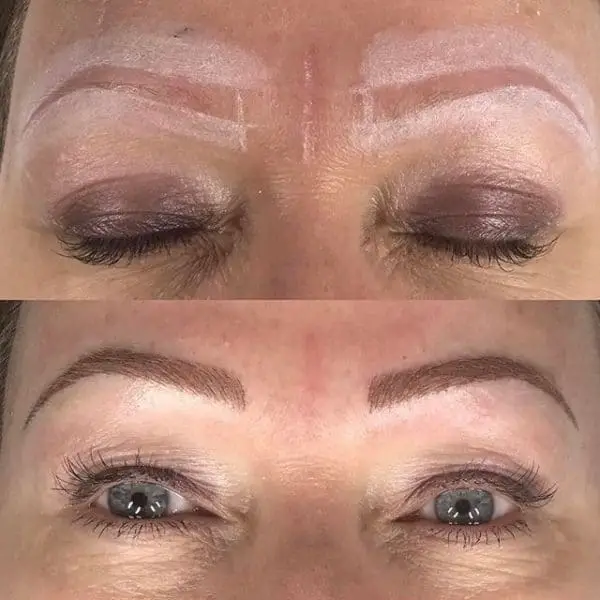
This client started with a small amount of natural brows but we were able to create basically a whole new set in a matter of hours.
But how can she maintain these amazing results?
I’ve included a list of recommendations which can help make your brows last as long as possible:
- Make sure to follow ALL of the aftercare instructions
- Avoid sunlight during the healing process
- Make sure to come in for your touch up within 6 weeks (do NOT forget this part, it is very important for long term results)
- Avoid placing any makeup over your brows while healing
- Make sure to continue with waxing every 6-8 weeks to maintain your brow shape after your procedure
- During the healing process make sure to eat as healthy as possible and consume as much water as possible to maintain hydration of the skin (you can also consider supplements to boost the healing process as well)
By following these simple rules you can dramatically increase the longevity of your results.
If you don’t follow these rules then you will still have results, but they may fade sooner than you anticipate.
For instance, your brows may fade in 6 to 9 months instead of 9 to 15 months.
What will reduce your results:
What factors will reduce the length of your results?
Some factors are in your control, and others may not be.
Factors within your control:
- Nutritional status (vitamin status and how healthy you eat can influence how you heal)
- Hydration of the skin (meaning you want to be drinking PLENTY of water)
- How closely you follow aftercare instructions (avoiding make up, sun, lotion, etc. on the wound while it is healing
- Smoking (smoking will reduce healing time and make your pigment fade quickly, please avoid smoking during the healing process)
Factors outside of your control:
- The age of your skin (older skin tends to retain pigment less than younger skin)
- Oily skin (the more oily the skin the shorter the results will last)
- Excessive sun damage
- Genetics and issues with immune function
- Hormone imbalances such as hypothyroidism or estrogen dominance can impact pigmentation of the skin
- Medical conditions such as high blood pressure or diabetes
- High levels of stress
By following the recommendations above and by controlling the factors listed in this section you can make your results last for as long as possible.
You can see an example of a client who followed all of the aftercare instructions perfectly below who also has very oily skin:

In the middle section you can see before her touch up that she retained about 85% of her pigment, but there is a huge difference in her brows after her touch up.
This is why being on time for your touch up within 6 weeks of your first appointment is so critical for lasting results.
How Long will Microblading Last Without the Touch up?
The touch-up is an extra procedure which actually helps solidify your shape and helps the procedure last a significant amount of time.
But what if you don’t want the touch-up or what if you can’t afford the touch up? What then?
Well, unfortunately that will definitely reduce the amount of time that your brows will last.
If you do NOT get the touch up then you can expect that your brows will probably only last anywhere from 2-6 months (depending on other factors such as oil production as so on).
So compare the 12-15 months WITH the touch up to the 2-6 months WITHOUT the touch up.
Because this difference is so big I recommend that if you are serious about getting your brows microbladed that you always get the touch up.
What if I want my Brows to Fade?
But what if you want your brows to fade?
What if you don’t like your brows or are unhappy with your results?
Will they still last the 12-15 months?
The answer is yes and no.
If you are unhappy with your results and actually WANT to fade them, then you can take several steps to help this process along.
By using certain steps, which I’ve outlined here, you can reduce the time that the pigment stays in your skin by months.
You can usually help your body push out the pigment over the course of 3-6 months depending on how aggressive you want to be.
I don’t recommend that you jump into this though unless you are 100% certain that you DON’T love your brows!
So make sure you understand what you are getting into if you decide to fade them quickly.
Make sure to find YOUR microblading artist
As always, if you plan on getting your brows microbladed make sure you find the perfect stylist for YOU.
Make sure you look at their work and you find that their style fits your needs.
If you have questions about microblading, about getting results or about my process please leave your questions below!
I am happy to help guide you, even if it is to another stylist.

Microblading Infection: Signs & Symptoms + What to look out for
Having an infection is a rare but potentially serious side effect from getting the microblading procedure done.
You should know that there is a small risk (around 1-3%) that you may have an infection after your procedure.
Most of the time these infections can be treated with over the counter antibiotics that can be topically placed on your skin.
In some serious cases you may need antibiotics, learn more about when you should and shouldn’t be concerned below:
More…
Quick NavigationSigns & Symptoms you may have an infectionOver the counter treatment optionsWatch out for Nickel reaction and RashesNever microblade over a wound, cut, burn or rash! When to see a Doctor
What is “normal” after the microblading procedure?
When talking about an infection it’s important to realize what is normal after your procedure and what is abnormal.
What is considered normal after you procedure?
- Some slight redness or swelling around the eyebrows (swelling that continues beyond 2-3 days may be an early sign of an infection)
- Some tenderness of your eyebrows that may last 2-3 days
- Scabbing of the eyebrows that may last up to 7 days
- Peeling of the skin or darkening of the pigment used
 <img class=”tve_image” alt=”Nichole progress picture before and after” style=”width: 640px” src=”//browsandbody.com/wp-content/uploads/2017/03/Nichole-progress-picture-before-and-after.jpg” width=”640″ height=”640″ data-attachment-id=”229″ scale=”0″>
(From the picture above you can see the redness directly around the site of the microbladed brow. Some redness immediately after the procedure is normal but it should subside very soon thereafter.)
These are considered normal changes to your skin after the procedure.
Remember that the microblading procedure does enter into the skin at the dermal-epidermal junction and any procedure that breaks the skin does require healing time.
Likewise any procedure that breaks that skin also carries with it a small risk of infection.
The biggest risk is developing a deep infection of the skin which turns into a condition known as “cellulitis“.
Cellulitis refers to an infection of the inner layer of the skin that can spread if not treated appropriately.
Most infections after your microblading procedure will be limited and can be treated with topical antibiotic creams.
If you do develop cellulitis, however, you will probably need antibiotic treatment.
This condition is hard to miss if you know what you are looking for and we will go over those symptoms below.
But first:
What should you do if you suspect that you have an infection?
The first thing you should do if you think you may have an infection is contact your microblader.
Each microblading artist (much like a Tattoo artist) should have a procedure on how to approach a possible infection.
This includes their recommended topical treatments or referral to a Doctor if necessary.
If they don’t have a procedure to follow then please consider using the recommendations that I use on my clients.
It’s important to note that infections are still VERY rare (in my experience about 1% or 1 in 100 people) but should be treated if you suspect it.
To date I have never had a client have an infection that required the use of oral antibiotics, but I have some some clients who do need temporary use of topical antibiotics.
Signs & Symptoms you may have an infection
Generally you will know if you are developing an infection based on your symptoms.
Below I will go over the most common symptoms on an early infection:
- Odor coming from your eyebrow
- Discharge that may be a greenish/brownish color
- Tenderness when touching(please avoid touching your eyebrows after the procedure!)
- Redness around the procedure site but not extending beyond it
These symptoms are early signs of an infection and may indicate an infection is starting.
At this stage you should contact your microblader and consider the use of topical antibiotics.
If the infection continues it may develop into a more serious infection with these type of symptoms:
- Swelling that extends into the eyelids or other places on the face
- Redness that extends beyond the eyebrow and up into the scalp or cheek area
- Warmth when touching the red areas
- Tenderness and/or pain to your face/eyebrows
- Fever or chills or increase in sweating (signs that suggest you have a systemic infection)
If you start to develop any of these worsening signs then you should see a Doctor ASAP.
These are early signs that you may be developing facial cellulitis and you may need oral or IV antibiotics.
Again, most of these symptoms can be treated as long as you catch it early, but you need to be aware of them.
Over the counter treatment options
If you are noticing the early signs of infection then you should consider using an antibiotic cream.
It’s also important to use other strategies to increase healing time and reduce the risk of developing cellulitis or a worsening infection.
Consider these tips if you have an early infection:
- Consider using an antibiotic ointment like Bacitracin (this is what I use if my clients have issues). Bacitracin will treat the most common skin pathogens such as staph and strep (even MRSA) and does not include ointments that can irritate the skin. This is the ointment that I use.
- Avoid using triple antibiotic ointment like neosporin which contains neomycin that approximately 1 in 10 people react to with a rash (that’s a LOT of people).
- Avoid covering up the microbladed brow with creams and gels such as vaseline or other emollients which can trap in heat and keep an infection in the wound (remember bacteria dies in the presence of oxygen)
- Consider using a cold pack on your eyebrows to reduce swelling and heat, this can also help alleviate some of the pain/tenderness
- Keep the area clean! Avoid using makeup or other topical agents (besides the antibiotic) on your skin/wound
Using these tips will allow your brows to heal quickly and should prevent the spread or worsening infection.
Watch out for Nickel reaction and Rashes
Another important consideration is that some clients may be allergic to the pigment that you place in their skin.
Reactions to pigment usually come from Nickel and should be discussed prior to your appointment (this should be on the waiver form and each microblader should go over this with the client).
People who have nickel allergies usually know it and will ask, but you should always double check.
A reaction to nickel looks like a rash or almost like a mini burn (image below):
 <img class=”tve_image” alt=”Nickel reaction and allergy to microblading” style=”width: 441px” src=”//browsandbody.com/wp-content/uploads/2017/03/Nickel-reaction-and-allergy-to-microblading.png” width=”441″ height=”234″ data-attachment-id=”286″ scale=”0″>
Rashes can create a site for infection but do not necessarily mean you have an infection if they flare up as noted above.
But because the facial area is so important it’s critical that you get evaluation by a Doctor if you notice swelling or redness like the picture above.
Never microblade over a wound, cut, burn or rash!
Remember:
If you have a wound, cut, burn or rash please push back your microblading appointment.
It is ok to microblade over a scar (as long as it is healed) but you should never microblade over a wound in the skin.
This will dramatically increase your risk of infection.
I have had several clients have to push back their appointments due to issues with cuts and/or burns from things like curling irons.
Just make sure that your canvas is pristine before your procedure!
When to see a Doctor
The bottom line is to always be safe.
If you notice something has changed or worsened quickly please make sure you seek medical attention.
Infections of the face can be very dangerous and should be treated with respect.
As long as you follow the proper guidelines you can reduce your risk of infection dramatically!
And remember that most clients tolerate the procedure VERY well and most clients do not end up with an infection.
Now it’s your turn:
Are you experiencing issues after your microblading appointment?
Do you have the early signs of an infection?
Leave any comments or questions below!

What is Microblading? + 10 Facts to Know Before you Get it Done!
Have you heard about the recent trend that is microblading?
Microblading is exploding in the US and it’s not hard to figure out why.
Microblading allows you to walk around with perfect eyebrows all day, ever day without messing around with make up each morning.
Regardless of how much you know or think you know, this post will help you determine what microblading is and help you determine if you should get your brows microbladed.
Let’s jump in:
What is Microblading?
Microblading is the name used to define a non invasive procedure that applies semi permanent eyebrows to your existing brows.
This small procedure helps transform your existing eyebrows and gives you the appearance that you have make up on 24/7.
Due to the process of microblading it also allows for perfect shaping of your eyebrow all year long.
Many women love the fact that they can customize their brow before we put the pigment on and make it last for over a year.
In fact many of my clients mention that people notice something “different” about them, but they can’t put their finger on it.
You can see an example of a before and after picture below:

On the left is the before picture and on the right is the finished procedure (after 3 hours).
10 Things to Know Before you get Your Brows Bladed
If you are on the fence about microblading or you are thinking about getting it done then make sure you know these 10 important tips!
They should help guide your decision.
#1. Microblading is Semi-Permanent
The first and most important rule is that microblading is NOT a permanent procedure.
Let me repeat that:
Microblading is NOT permanent.
Microblading is considered a semi-permanent procedure which means that it lasts a long time but it is NOT permanent.
You shouldn’t think about microblading the same way that you think about permanent make-up or about tattoo’s – they are not the same.

Microblading will place pigment into your skin but because it doesn’t go as deep as tattoo’s it will not be there forever.
For those interested in the science of it, the microblading pigment is actually placed in the dermal epidermal junction (compared to the dermis for tatoo’s) which means that your body will naturally push out the pigment over time.
It’s more like a “mini tattoo” because pigment is placed in your skin but it will fade 100% over time.
If you decide you don’t like your brows you can also take certain steps to increase the fading process (so don’t let that scare you!).
#2. It may Hurt!
Microblading is NOT a painless procedure.
Imagine taking 10+ tiny needles and poking them into the skin and them dragging them across the skin with the intention of creating a little divot or well.
This is EXACTLY what is happening during the procedure!
The good news is that most artists use numbing cream or topical anesthetic to help reduce the pain.
But just because numbing cream is used doesn’t mean that it’s 100% painless.
Despite this cream some patients still feel a significant amount of pain.
In my experience some 20% of patients feel absolutely nothing, while some 60% of patients feel very little and the remainder actually have a painful experience.
But don’t let the pain scare you!
Microblading may just give you the brows you’ve always wanted, and an hour of pain is worth 15 months of beauty!
#3. Microblading vs Shading
There are really two important procedures that you can get when talking about microblading.
The first is microblading and the second is micro shading or just microblading shading.
Microblading is the procedure which results in curved lines and this procedure is done by pulling or tugging the microblade across the skin.
Microblading creates brow like strokes which very closely mimic your natural brows.
Basically it can be added to your microblading procedure and seriously enhances your results.
Microblading makes your brows look “done up” while shading makes it look like you have make-up on 24/7.
The shading process is a more complicated procedure and it is also done with the microblade, but instead of pulling or tugging the blade is stippled into the skin in a tapping like fashion.
Shading can also be painful so consider that!
#4. Choose your Artist Wisely
Just like picking our your doctor or your dentist you want to make sure you pick the RIGHT artist for you!
Each artist has their own artistic styles and tends to create brows that look similar – even though not exactly the same.
For this reason it is so important that you do your homework before you pick your artist!
Look at each artist, look at their before and after pictures and determine if they will be able to provide you the results you are looking for.
Remember:
Microblading is not permanent, but it does last for MANY months – the last thing you want is for you to spend a lot of money and NOT be happy with your results!
#5. The Touch Up is Not Optional
This may surprise you but the microblading procedure is actually 2 procedures.
The first and initial procedure followed by what is known as the touch-up.
Both procedures are basically the same but the second procedure is super important because it is the procedure that “locks in” your results and makes them last for a long time!
The touch-up is also the time to fix any mistakes or change your shape slightly so that it meets your goals.
You can also change the color, use a different pigment, alter the shape and add or take away from your brows – it’s the perfect tool for perfection.
The initial procedure is about 2-3 hours long and during this procedure you will have your brows placed on your face.
The touch-up is usually about 60 minutes long and the same procedure occurs but with any changes that you desire.
The touch up is usually completed around 6-8 weeks AFTER the initial appointment and after your brows have completely healed.
Most artists build the price of the touch-up into their total price, but some have an extra fee.
Make sure you know if the touch-up will add to your total cost so you won’t be surprised!
#6. You May go Through an Emotional Roller Coaster
It’s not easy to change the shape of your existing brows or to look like a new you.
Because of this it’s absolutely NORMAL for you to have ups and downs in your emotions and to go through a roller coaster ride after you get your brows microbladed.
Believe me when I say that you are NOT alone!
Almost everyone who walks out of their procedure thinks their brows are too thick, or too dark or don’t fit their face… at least initially!
Sometimes it just takes some time for you to settle into your new brows – so just allow that time to happen.
If you don’t like your brows immediately after your procedure make sure to wait at LEAST a week before you make a decision to keep them or not.
98% of the time you will decide you actually LOVE them and you will want to keep them.
It’s also important to know that some fading of your brows is completely NORMAL after the procedure.
In fact your brows will always start out darker than necessary and fade during the healing process.
#7. If You Don’t Like your Brows You Have Options!
Another important fact is that you do have options if you don’t like your brows after the initial appointment.
You ALWAYS have the option to try and rapidly fade them (you can make them completely go away over a few months) if you desire.
In addition you can almost always fix whatever things you don’t like about your brows in the touch-up session.
You can have your artist change your shape, alter the style, change the pigment, control the color and so on.
Just make sure you don’t freak out and keep your cool while you think critically about what you want to do.
#8. Don’t be Surprised if your Brows are not 100% Symmetrical
Believe it or not we actually don’t want your brows to look identical.
You probably don’t believe me so hear me out:
Even plastic surgeons when they do breast augmentations and other cosmetic procedures do not go for perfect symmetry.
Our eyes are conditioned to spot imperfections and we are attracted to those imperfections.
This is why no one is perfectly symmetrical.

In fact when you make things perfectly symmetrical it often looks funny or not quite right.
The saying is that you want your brows to look like sisters and not like identical twins.
You also have to consider the shape and anatomy of your face.
Some women may have asymmetry in their bone structure which may limit the ability to make your brows perfectly symmetrical and this is a good thing.
Don’t walk in expecting that you will get 100% symmetry! And believe me when I say that you don’t actually want it.
#9. It’s Not Cheap!
I would be lying if I said that microblading was cheap!
The average cost of microblading is somewhere between $350 to $600 (depending on who you go to and where you live).
It’s actually not bad if you consider that it may save you 30-60 minutes of getting ready each morning AND you only need to pay that once, but it’s still a lot out of pocket initially.
So how much will microblading cost you over time and for upkeep?
The initial price is going to be high but the up-keep (a touch up every 12-15 months) will only run around $200-$300 per year.
So the total cost is quite small if you average it out by month!
But don’t walk into this unless you know how much it will cost.
I recommend you look at local prices before making your decision.
Prices tend to be much higher in larger cities and much lower in smaller cities (it just depends).
#10. Most People are VERY Happy With Their Results
The bottom line?
Most people who get their brows microbladed are VERY happy with their results.
Very few women get microblading done and then regret their decision.
It certainly does happen, and you will find some of them on this site, but the vast majority of people who get it done absolutely love their brows afterwards.
If you follow these 10 tips then you shouldn’t have any problem in knowing whether or not it is the right choice for you.
How long Does microblading last?
Generally results will last anywhere from 9 months to 15 months.
You will likely retain the majority of your pigment for that duration of time, and it will begin to fade around the 9 month mark.
Depending on the texture of your skin, how old you are and how much oil your face produces these results may be longer or shorter.
People who produce more oil, or who are older will notice that their results fade more quickly.

Does microblading require any up keep?
For the best possible results you really need two visits:
The first visit is to place the pigment and set the outline of the brow. During this appointment you will have the microblading procedure done on your brows.
The first visit is about 2-3 hours.
The second visit is the most important visit for retaining the pigment and for retaining your results.
This visit allows any final changes to your shape or for making slight changes to your brows.
During this second visit we go over our previous shape with the microblade and it “seals” in the pigment even further for long lasting results.

This second visit is much shorter than the first (usually about 60 minutes).
After your second procedure you really don’t need another microblading session until your pigment begins to fade – usually around the 9 to 15 month mark.
It is a good idea to come in to have your eyebrows tweezed to maintain your shape and keep the brows looking beautiful.
Should you get your eyebrows microbladed?
Bottom line:
If you want long lasting beautiful brows that don’t require upkeep or time in the morning then YES you should get your brows microbladed.
The single most important part about the process is finding the stylist that matches your preferences!
Before you choose your stylist make sure your study her work and don’t be afraid to tell them what you want during your appointment! Speak up!
I hope this was helpful, leave any questions or comments below!

Does Microblading Hurt? 4 Tips to Make it as Comfortable as Possible
Are you interested in microblading but worried that the application might hurt?
Don’t let the process scare you because it’s not NEARLY as bad as you are thinking.
Yes, it is done with a microblade and yes the goal is to put pigment into the skin so that it stays for several years but several precautions are taken to reduce the discomfort of the procedure.
In this article we are going to talk about:
- Why microblading doesn’t have to hurt
- What to expect during the procedure
- How to make the procedure as comfortable as possible
More…
What Exactly is Microblading?
Microblading is the art of placing taking a small and precise blade and applying pigment into the skin to make your eyebrows look perfect.
The process does involve small cuts into the skin where the eyebrows.
This is the part that tends to freak people out.
The use of a BLADE, but don’t let that freak you out.
Microblading is less painful than getting a tattoo but slightly more painful than plucking out your eyebrows or getting a wax.
But at the end of the day would you rather have 1-2 hours of slight discomfort for 1-2 years of no hassle, make-up ready eyebrows each and every morning?
If the answer to that question is yes, then you are a prime candidate for microblading 🙂
And if you are still a little bit freaked out then consider this:
A special topical numbing agent is used to help decrease the pain on your skin.

This lidocaine based numbing cream is similar to what dentists use for procedures, only this stuff just absorbs through the skin.
Did I mention that this numbing cream is the same stuff that Dermatologists use prior to laser resurfacing?
Yes – it is quite powerful and really helps to decrease any unpleasant sensation during the application of the pigment into your skin.
It’s also important to remember that the placement of the pigment is only about 1mm into the dermis.
The uppermost and thinnest layer of skin is the epidermis.
This is the part of skin that constantly sheds off over time. Under this surface is the Dermis and placing the pigment in the Dermis is what makes it last so much longer.
The deeper the pigment is placed the longer it will last:

In the image above you can see where the pigment gets placed during a tattoo (deeper into the dermis).
The deeper the pigment goes the more pain you experience.
Make sense?
The art of microblading is putting the pigment deep enough so that it becomes semi-permanent, but not too deep so that it becomes painful and stays forever.
What to Expect During the Procedure
The initial appointment is about 2 hours long and most of it is spent making sure that the outline for your brows is perfect.
Once the outline is in place I put topical anesthetic (lidocaine) over the area to prep it.
After 15-20 minutes (enough time to allow the lidocaine to set in) I then start to place the pigment into epidermal/dermal junction.
During this part of the procedure you may experience some pulling, stinging and pressure.
The amount of pain and discomfort during this period depends largely on your pain thresh hold, how sensitive your skin is and how nervous you are about the procedure.
Most clients end up telling me that it was NOT nearly as bad as they thought it would be, especially with the numbing cream.
This portion lasts about 30-60 minutes.

Most clients say it feels similar to plucking or waxing their eyebrows (maybe slightly more uncomfortable).
But the end result is AMAZING and I haven’t had a single client yet feel the slight amount of pain is not worth the end result.
Tips to make the procedure as painless as possible
I’ve also found several tips to help reduce any of the pain or discomfort during the procedure.
If you get it done with me you may have any or all of these:
1. Listen to relaxing music
Believe it or not listening to relaxing music can help keep your mind pre-occupied and give you an ambient environment helping your body to relax.
Much of the discomfort comes from the “unknown” so as long as you read up on the procedure and come prepared you should be fine!
2. Make sure you are comfortable (Room temperature + padding)
You should be looking for that “spa-like” environment here.
Cooler temperature, ambient noise, soft padding… you know what I’m talking about.
All of these things help calm down the mind and reduce pain receptors.
3. Apply generous amounts of lidocaine numbing cream (2 applications if you go through it quickly)
Some of you out there are just resistant to anesthetic (you know who you are!).
If this is you, feel free to speak up and let me know!
Some people just require more anesthetic than others, so we can apply a second coat or double up on the topical application.
4. Anti anxiety medication prior to the procedure (Like Xanax)
Not everyone will need this, but if you have a personal history of anxiety then you might want to consider this option.
Just like Doctors provide anti anxiety medication prior to procedures, you may also want to consider taking an extra pill prior to yours.
Not many clients will need this, but the more relaxed and the more comfortable you are – the less you will experience pain!
So… Should you get the procedure?
So, after reading all of this I hope you have an idea of what to expect during the microblading procedure.
The bottom line is this:
Microblading doesn’t have to be a painful procedure if it is done correctly.
The application of numbing cream, and set up of the environment all play a role and can really impact your discomfort levels.
Let me know if you have any questions below!