
30 Beautiful Microblading Before and After Pictures from Real Clients
Microblading is the art of applying semi permanent brows to your current set of brows using special pigment.
Microblading creates a beautiful and perfectly shaped brow that looks make-up ready without any fuss or hassle.
The entire procedure lasts around 3-4 hours and afterwards you walk out with perfect brows that will last up to 15 months before they start fading.
Do you want to see some real microblading before and after pictures from real clients? If so read on:

More…
Microblading before and after pictures:
#1.

Microblading can instantly add dimension and depth to your face.
This particular client started with very blond eyebrows that were difficult to see but afterwards she has a stunning result that acts almost as an instant eye lift.
I forgot the before picture but you the initial picture outlines exactly what her natural brows look like.
#2.

When done correctly microblading heals in a very natural way.
This client now has the gift of sleeping 20 more minutes each morning because she wakes up looking put together.
This example also gives you an idea of what your brows might look like 6 months after the initial appointment.
You can find more information on how to extend your results here.
#3.

Progress pictures always help to visualize the process.
This picture shows her before picture with very little natural brows, her picture after her initial visit, her healed (but before her touch up) and finally her brows after her touch up.
You can easily see the transformation of her brows over 2 months.
#4.

With microblading you have complete control over what your brows look like BEFORE we add the pigment.
Together (with your stylist) you will sit down and shape out your brows and define your arch, length and whatever else you prefer.
After you have decided the shape that you want THEN the pigment and microblading process begins.
#5.

Your initial appointment lasts around 3 hours, the actual microblading process is only about 1 hour.
The first 2 hours are spent shaping your brows to fit your face.
The last hour is spent doing the microblading process to each brow.
The final product is what you see!
#6.

Your eyebrows should be shaped free hand and without a stencil for best results.
Make sure to find a stylist that is comfortable doing it this way because using a stencil may result in a brow that doesn’t fit the dimensions of your face.
#7.

She healed beautifully before the touchup! You can tell the color softens so much throughout the healing process.
#8.

Thank goodness for selfies when you forget to take pictures of them healed! They soften so much once healed.
Lots of women worry they will be so dark and so thick and during the initial healing they WILL feel that way. But this client like many come back at the touchup and ask to go a bit darker!
I promise you my ultimate goal in doing your brows is to have people compliment you without knowing it’s your brows that have changed. I know the initial result can feel like a shock. But trust me if you pick me to be your artist you will have gorgeous natural brows that compliment your bone structure have a color that is completely natural
#9.

Most of my clients are surprised by the fact that many people notice something different about them after the microblading procedure but they are sure what.
They end up getting compliments for looking “put together” even without having make up on.
#10.

The complexion and color of your skin can change what type of pigment that we decide to use.
It’s very important that you find a stylist with understanding of proper color theory for best results. +
#11.

It’s easy to see the subtle differences in this split screen.
Her before is on the left side of the screen and her after is on the right side of the screen.
#12.

I try to make the procedure as comfortable as possible by using special numbing cream before we do any of the microblading.
This numbing cream has lidocaine in it which we place over the brows and let it sit for 20 minutes before we start the procedure.
This helps reduce the discomfort of the microblade itself (which is really just a grouping of needles).
Some patients are more sensitive than others, but the majority of the time pain is not an issue.
#13.

Scared of needles? Don’t worry!
The microblade itself is very tiny and consists of several tiny little needles.
The blade makes a well in your brow that we fill with pigment and because the application is semi permanent it means we don’t have to go as deep as a real tattoo.
People who have had tattoo’s done and microblading done say that microblading is easier than getting a tattoo.
#14.

Together we will pick out the pigment that best matches your skin color and your goal for your brows.
Some women want a darker, more prominent color for their brows and others prefer a subtle approach.
Either way, we have many options!
#15.

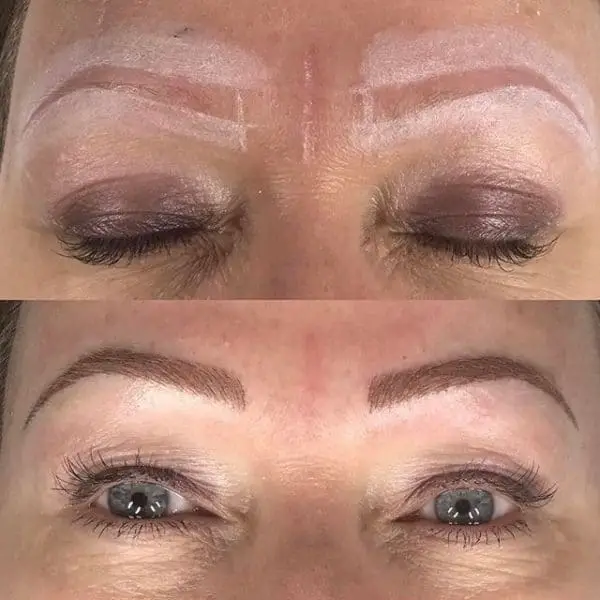
You can even microblade over a previous brow tattoo.
The difference is huge as you can see above.
Make sure to let your stylist know that you’ve had a previous tattoo.
#16.

It’s a good idea to get regular brow waxing every 6 weeks after you microblade your brows.
Waxing can help keep your brows looking pristine and perfectly shaped!
#17.


It might help to visualize the before/after process but also to see the brows in a selfie.
I love it when my clients send me selfies of their brows!
#18.

#19.

There will be some fading of your pigment after the first visit and before the touch up.
This is NORMAL.
And this is why it’s so critical to come in for your follow up appointment.
The “second pass” during your follow up appointment will make your results long lasting.
#20.

#21.

Microblading can add a huge boost to your confidence.
I love it when I get to see the explosion of confidence in certain women after they have their brows done.
#22.

Microblading can even help in situations where you’ve lost your brows due to hormonal issues like thyroid problems or even other problems like trichotillomania.
I’ve even done clients after chemotherapy.
#23.

Did you know we can microblade over scars on your face?
We can still place pigment over any scars on your face that may limit any natural growth of your native brows.
One of my clients had a dog bite that permanently scarred one of her brows and we were able to microblade right over it.
#24.

You can get your brows microbladed at any age.
I’ve had 18 year olds come in to get microbladed and I’ve had people as old as 68.
You’re never too young or too old to add dimension to your brows.
#25.

Shading is a way to add thickness and volume to your brows, it also makes them look more natural.
Shading is different than placing strokes and involves different motions with the microblade itself.
Shading will fill in the brow and make it look even more natural.
#26.

Some women are spending up to 2 hours in the morning on their brows!
Wouldn’t it be amazing to cut down that time to 5-10 minutes in the morning?
This is especially true if you find yourself applying a new set of brows EACH and every day.
Not only that but by applying your brows to your face each day you might have some good “brow days” and some bad “brow days”.
With microblading you can make every day a good brow day.
#27.

You’ll be surprised how many compliments you get walking out of the house without make up after you have your brows microbladed.
There’s something about having your brows on point that adds a “put together” look on your face.
#28.

Make sure to find the stylist that best fits YOUR needs and goals.
Before you choose make sure to look at their work and make sure that it matches your style as well.
If you have questions about finding the right artist leave them below! I am happy to help you even if you don’t choose me as your stylist.
#29.

Even if you have very few natural eyebrows we can still create the perfect fit for you.
The shaping process allows us to create an entirely new set of brows that match your face perfectly.
#30.

Leave your questions below!